Still Wombling On!

T’was the night before Christmas and I was hunting around for some decent clear cellophane or similar with which to glaze some windows on a model.  As nothing remained in my modelling stores I packed up until after Christmas when I could purchase some more.

Christmas present opening over and debris clearing under way.  Our Council are keen on their recycling targets and so I was separating out the non recycling when there it was, staring me in the face, the perfect clear glazing sheets from the Christmas cracker lid and the packaging encapsulating the Minion’s ‘Fart Blaster‘ (brilliant present, by the way.  Hours of childish fun!).

So now I have for free acres of clear sheet.  Uncle Bulgaria would be proud!


Ryobi Start Lever Repair

Our Model Engineering Club purchased the excellent Ryobi Petrol Line Strimmer, model RLT30CESA.  It has performed reliably and is heavily used during the summer on our 7 acre site.

Missing Start Lever

Missing Start Lever

Sadly its one design defect is the plastic start lever.  This is not robust enough to survive the rough handling that Model Engineers are known for.

Broken Start Lever

Broken Start Lever

The plastic shaft splits when it is forced too far back against the stop, the handle then falls off and the machine is hors de combat.

Speaking to Ryobi they do not supply a replacement start lever, instead you have to purchase the full carburettor assembly (Part Number 5131-008533) at a cost of £36.87 plus postage.  Now I found that rather expensive for what would be an inexpensive plastic piece.

So I came up with a much more robust solution made out of brass.

Replacement Start Lever

Replacement Start Lever

Turn out a brass collar 0.410” Ø by 0.265” deep.  Next turn out a handle 0.187” Ø by 1.0” long.  Silver solder the handle to the collar.

Then drill a 5mm Ø hole across the collar to take the shaft from the carburettor choke butterfly.  At 90⁰ to this drill and tap a hole 8 ba to take a locking grub screw.

Place the new start handle over the shaft, apply some stud lock to the grub screw and then tighten up to hold the shaft.  Replace the air box cover and violà a working Ryobi Strimmer once more.

Ryobi Start Lever In Run Position

Ryobi Start Lever In Run Position

Ryobi Start Lever In Start Position

Ryobi Start Lever In Start Position

The repair also works for the:

OEM # 308054015
RBC30SESA (Petrol Brush Cutter)
RBC30SBSA (Petrol Brushcutter)
RHT2660DA (Petrol Hedge Trimmer)
RLT30CESA (Petrol Line Trimmer)
RLT30SESA (Petrol Line Trimmer), ORLT30PRT and the RPR3025JA (Pole Pruner)

If you wish me to make one for you then please contact me for price.

This is what a purchaser wrote about the replacement lever

The Restorers Dilemma

Have been asked to restore a clock that was constructed by the owners father as a school project.  The mechanism is brass and from a much earlier clock as revealed by the brass pendulum bob which is inscribed ‘St Paul’s Church’ and the rear of the mechanism body which is further inscribed with the names and dates of previous services.

The wooden body is mahogany and has been adapted from something else whilst the face has been hand made and painted by the father.  When newly completed it would have been a very comendable school craft project.

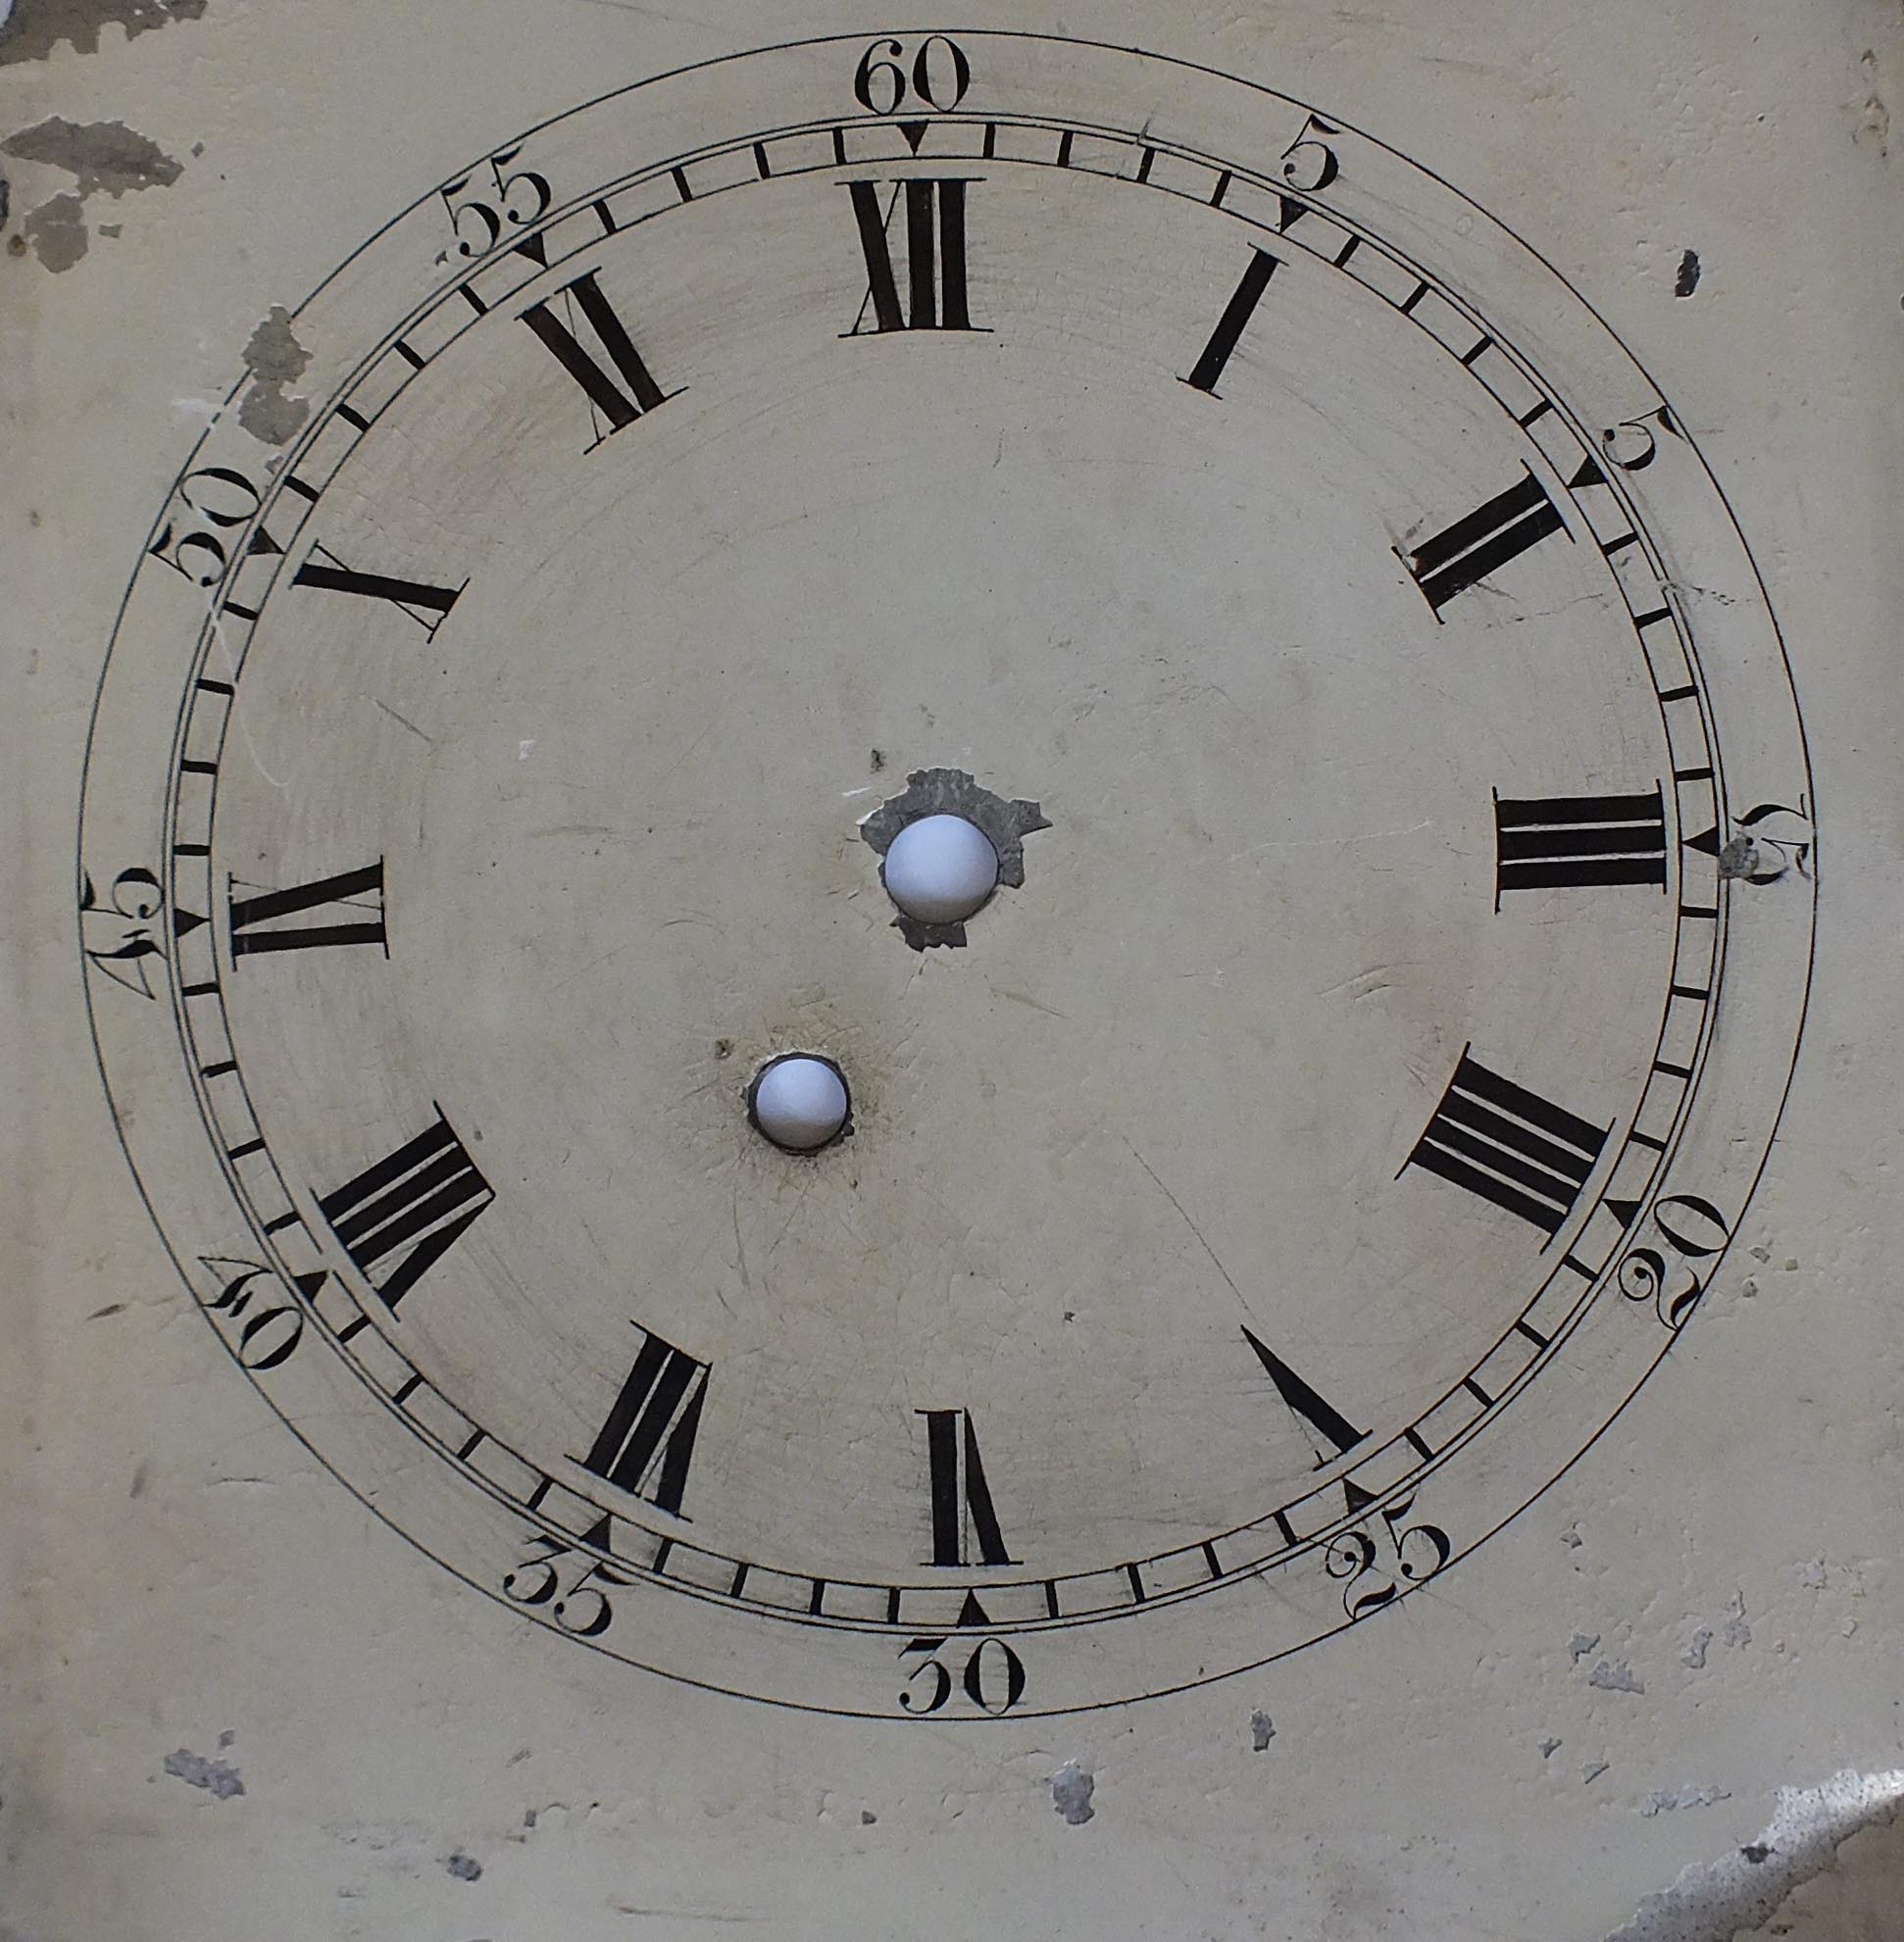
It is the face of the clock wherein lies the restorer’s dilemma.

It didn’t strike me at first, but on closer examination something was not right.  It was then that I discovered the number sequencing on the outer part of the dial was wrong.

Time Stands Still

Time Stands Still

From the top it went 60, 5, 5, 15, 20, 25, 30 etc.

Here is the question; do I restore the dial ‘as is’ complete with error or do I correct it?  The owner was unaware of the problem (a question of the brain seeing what it wanted to see?), but has said they will leave it up to me!

This occurs time and time again when restoring someone elses work, do you rectify errors or restore them?


As theses items are rarely required for historical accuracy, but for the pleasure of the owner, then often the errors add to the charm of the model or item.

So, what to do in this case?  Well, I think the solution is to conserve the exisitng dial as it is part of the clock’s charm.  If the owner decides they want a correct dial then I shall make them a new one and they can keep the original for posterity.

As long as no one thinks the conserved error is actually an error on the part of the restorer!

HMS Warrior model by William Mowll

Just returned from a visit to the Portsmouth Historic Dockyard.  Principally this was to see the new museum for the Mary Rose and as an ‘extra’ a visit to HMS Warrior.

As expected the Mary Rose was fantastic.  It lived up to and exceeded my expectations.  Too often I am disappointed by what I call ‘Mickey Mouse’ museums which have been dumbed down in the name of progress (sorry, but I include the recently refurbished SeaCity museum in Southampton under this category).  The Mary Rose Trust have excelled themselves and I thoroughly recommend it.

A Wonderful Job

A Wonderful Job

The restored HMS Warrior was another breath taker. The detail that has gone into recreating the ship is astounding.  The quality of the work is such that you could believe it had never spent its time as a derelict mooring barge.  One of my lasting impressions was just how big and solid it felt when on the main deck.  What a shame as a nation we have not preserved one of our World War Two Battleships, that would be truly awesome.


Undressed?

Undressed?

HMS Victory on the other hand was looking very much the very poor relation as she is in the middle of her major refit.  Ships are referred to in the feminine tense and when one gazed upon her I couldn’t help thinking that it felt like I had caught her in the middle of getting dressed.  Weird.


Beautiful Job!

Beautiful Job!

However, the unexpected jewel (for me anyway) had to be the 1:48 scale model of HMS Warrior in her glass case in the Dockyards main entrance lobby.  This was totally unexpected and was quite unlike all the other large scale builders models I have seen over the years.  No matter how grand the builders models are somehow they come across as just that, models.  Perhaps it’s the too perfect paintwork or the gleaming brass work that makes them look unrealistic.

Midships

Midships

Stern Detail

Stern Detail

The model by William Mowll seems to have captured the soul of the real thing.  It looked impressive and I am sure that if it was seen on the water under steam and sail it would look as if it meant business.  A powerful, purposeful beast if ever there was one.

A credit to the builder.  I hope my pictures do it justice!

That ‘Eureka!’ moment……

Have you ever needed to reproduce a specific logo, name or writing on the model you are scratch building or restoring?  Up until recently the only way I knew of was to either find a supplier who had the ones you required or to hand paint or draw them directly onto the model.  A case in point was the restoration of the Louis Marx Southern Pacific Crummy.

Recently I was looking at reproducing a Plimsoll Line for the steam yacht I was restoring and when ‘GOOGLING’ for water slide transfers I came across the Crafty Computer Paper of Leicester.  They advertise various papers for printing your own decals and so I purchased their Inkjet Water-Slide Decal Paper. Provided you follow their very clear instructions (which includes a YouTube video) then you can’t go wrong.  Prompt service too.

The clear Acrylic Varnish that I used is the Humbrol Crystal Clear (AD7550) spray.  Two coats and it works a treat.  Hope this is of use to others.

Warning, hazardous to health!

So screamed the label on a packet of Cadmium Free, Easy-Flo 55 Silver Solder Wire purchased from a Model Engineering Supplier.

Quite rightly it went on to warn of other dire health hazards and ‘thou shalt not’.  And there was me thinking the new stuff was safer!

Well it had the desired effect as I decided to look up on the internet the COSHH information.  On the Johnson Matthey website were several .pdf which explained all about the product, its uses and the sensible precautions to take when using it.

In fact the sheets put my mind at rest about the performance of the product too.  All these earlier scares on ME Forums about the solder not flowing and people rushing to buy up exisitng stocks of Cadmium containing products had persuaded me to defer as long as possible switching to the Cadmium Free.

So that afternoon I used the product to silver solder a copper pipe to a brass nipple.  An absolute joy to use.

Self contained steam plant

Last week I happened upon my first stationary steam engine, a Stuart Turner mill engine, which I used to play with as a young boy.  It had sat in a box for at least five years and was in a rather sorry state.  So in a fit of conscience I decided to restore it and match it up with a vertical boiler I had built some years ago.

The result is a self contained mini steam plant which I can fire up whenever I suffer with ‘steam withdrawal symptoms’ which is usually in mid winter!  The vertical boiler is to a design by GLR of Daventry, Northampton and can be fired on either gas or coal.

The gas burner was designed by myself as a ring rather than using a ceramic type.  The result is a nice quiet burner without the harsh roar associated with the ceramic ones.  In the summer I swap the burner for a grate and run it on coal.

Completed Unit

The completed unit

Working Pressure 50 psi.

Restored Mill Engine

Restored Mill Engine

The Mill Engine has the number 76 stamped on various parts.

Lining is Trimline self adhesive coach line by Model Technics of Shoebury, Essex.

Reflections in the paint finish…..

In the July issue of ‘Old Glory’ Jerry Thurston wrote a very interesting article (Paint Your Wagon) about the importance of a good paint finish setting off a model.  I would whole heartedly agree with the sentiments.

What Jerry did not add was the importance of keeping that good paint job ‘good’.  I myself have a 7¼” gauge ‘Wren’ built to a superb standard by Alex Gray in 1991.  I have owned the model for 20 years and the engine works hard for a living.  The paint finish is as good as the day she was built.  Over the years I have had many compliments about the condition of the paintwork as well as a number of people assuring me the model must have been repainted!!

The secret to keeping the paintwork fresh is not to clean it whilst the engine is in steam or wet.  Too many times I have watched model engineers wipe their model down with a dirty rag, often spraying the model with WD40 first.  You might as well use emery paper!  All the bits of grit on the model get in the rag, aided by the WD40 and any oil on the cloth, which then act as an abrasive and scratch the paint, dulling it down.

Only when the engine is cool and completely dry do I start the cleaning process.  This involves blowing off the fine ash and grit first.  Then spray on wax furniture polish and with a clean duster gently wipe it off, this ensures the grit then ‘floats’ off the paint.  Regularly turn the duster about to get a clean spot and this way you will avoid trapping a bit of grit and scratching the paint.  Once the grit is off take a second clean duster, apply more wax and polish to a bright shine.  Some may think this process laborious or unecessary, but the proof of the efficacy of this method is in the longevity of the finish.

Mind you the corollary of all this are the smaller scale modellers, (‘O’, ‘OO’ etc), who like to ‘weather’ their engines for a more realistic effect.  Ah well, you can’t win I suppose.

Why are modellers anonymous?

Just returned from holiday in Norfolk.  During this time I visited a number of museums, country houses, churches, cathederals and libraries.  There were many models of different subjects, shapes and sizes on view, all lovingly created by someone.

Who those ‘someones’ were will remain a mystery as in the majority of cases there was no information.  It seems that as a breed modellers are most reluctant to leave their mark on their work for posterity.  The details of the builder become even more obscure the more times the model changes hands.

The number of Auctions I attend which have unloved models up for sale and no one knows who built them.  Often all the Auctioneer can say is that it has come from ‘a house clearance’.  So one assumes that the proud builder has died and the family are no longer interested in it.  You can pretty much bet that the model will not have any details of the builder on it.

Take as another example the case of a model galleon which at one time was exhibited in the Science Museum from 1921 to 1925 and a black and white image of which appears on the internet if you google ‘Elizabethan Galleon Model’.  Contacting the Science Museum elicits the information that it was built by a gentleman by the name of Freke Field.  Who Freke Field was, why he built the Galleon and what happened to it are, it seems, unknown.

Artists it seems are much prouder of their work and they put their name on it.  Surely a modeller is also an artist?

So if I have a plea, please at least put your name on the model and the date you built it.