

Author Archives: James Gillanders
The Restorers Dilemma
Have been asked to restore a clock that was constructed by the owners father as a school project. The mechanism is brass and from a much earlier clock as revealed by the brass pendulum bob which is inscribed ‘St Paul’s Church’ and the rear of the mechanism body which is further inscribed with the names and dates of previous services.
The wooden body is mahogany and has been adapted from something else whilst the face has been hand made and painted by the father. When newly completed it would have been a very comendable school craft project.
It is the face of the clock wherein lies the restorer’s dilemma.
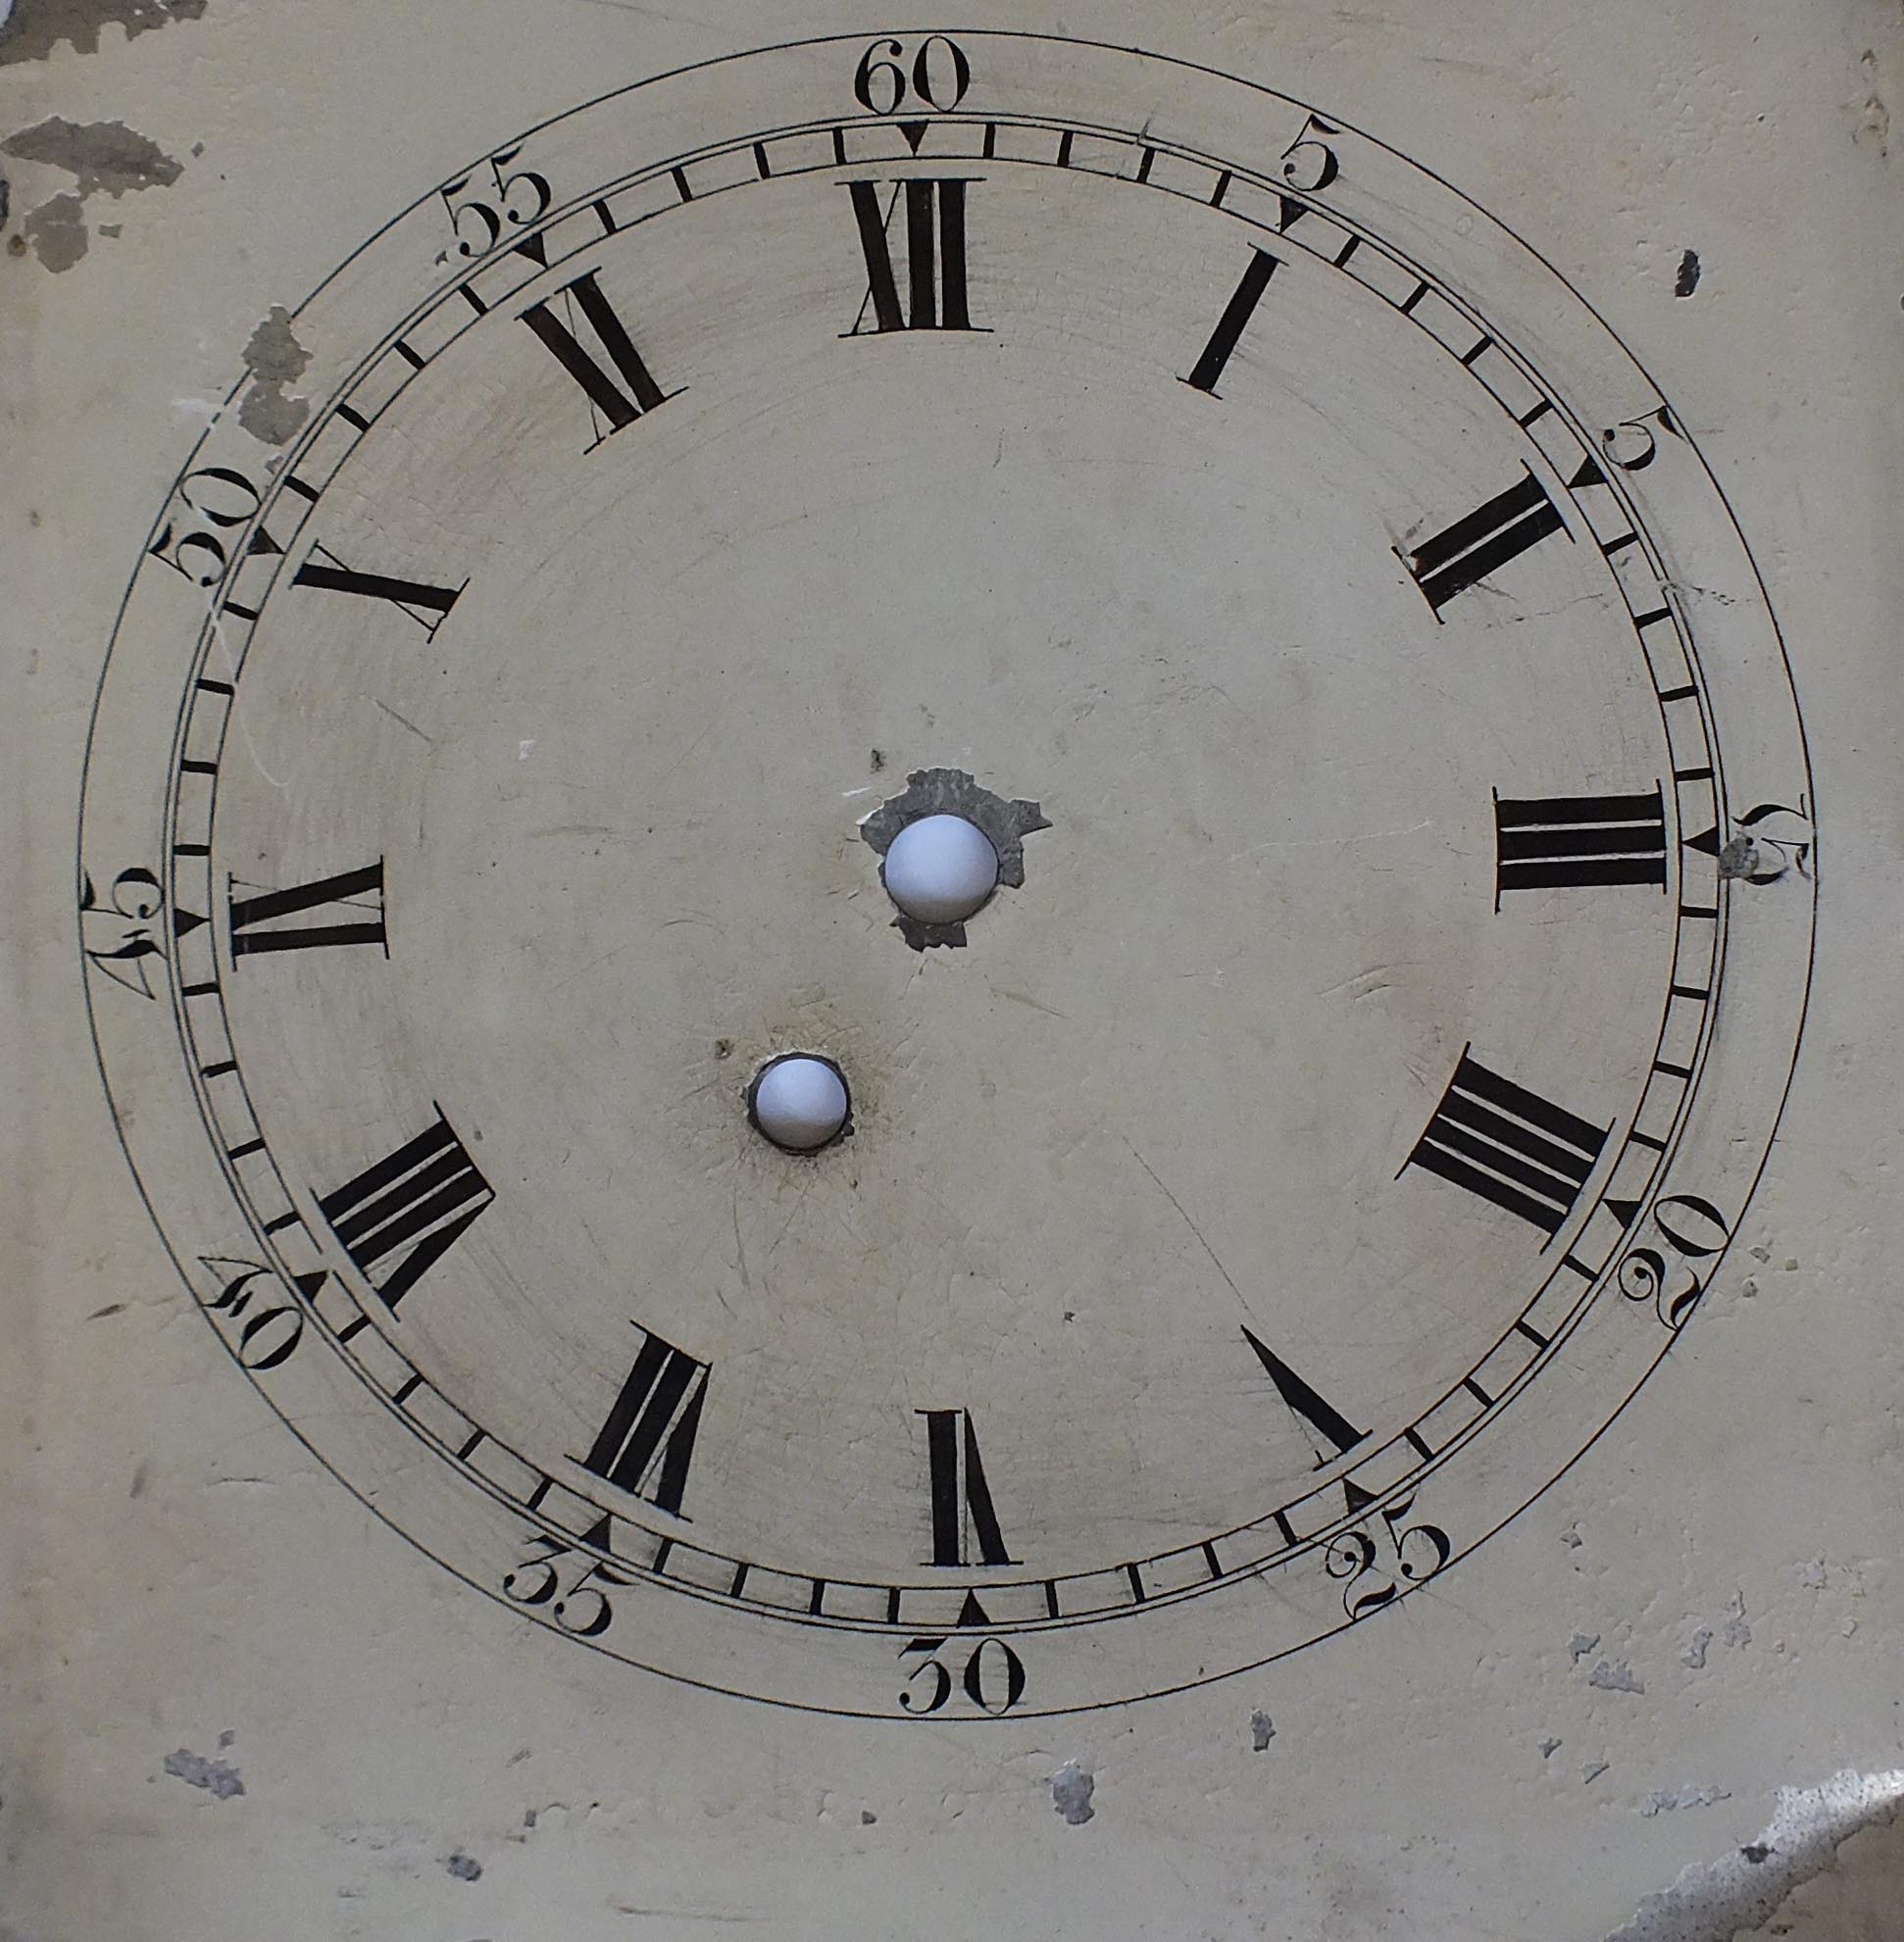
It didn’t strike me at first, but on closer examination something was not right. It was then that I discovered the number sequencing on the outer part of the dial was wrong.
Time Stands Still
From the top it went 60, 5, 5, 15, 20, 25, 30 etc.
Here is the question; do I restore the dial ‘as is’ complete with error or do I correct it? The owner was unaware of the problem (a question of the brain seeing what it wanted to see?), but has said they will leave it up to me!
This occurs time and time again when restoring someone elses work, do you rectify errors or restore them?
As theses items are rarely required for historical accuracy, but for the pleasure of the owner, then often the errors add to the charm of the model or item.
So, what to do in this case? Well, I think the solution is to conserve the exisitng dial as it is part of the clock’s charm. If the owner decides they want a correct dial then I shall make them a new one and they can keep the original for posterity.
As long as no one thinks the conserved error is actually an error on the part of the restorer!
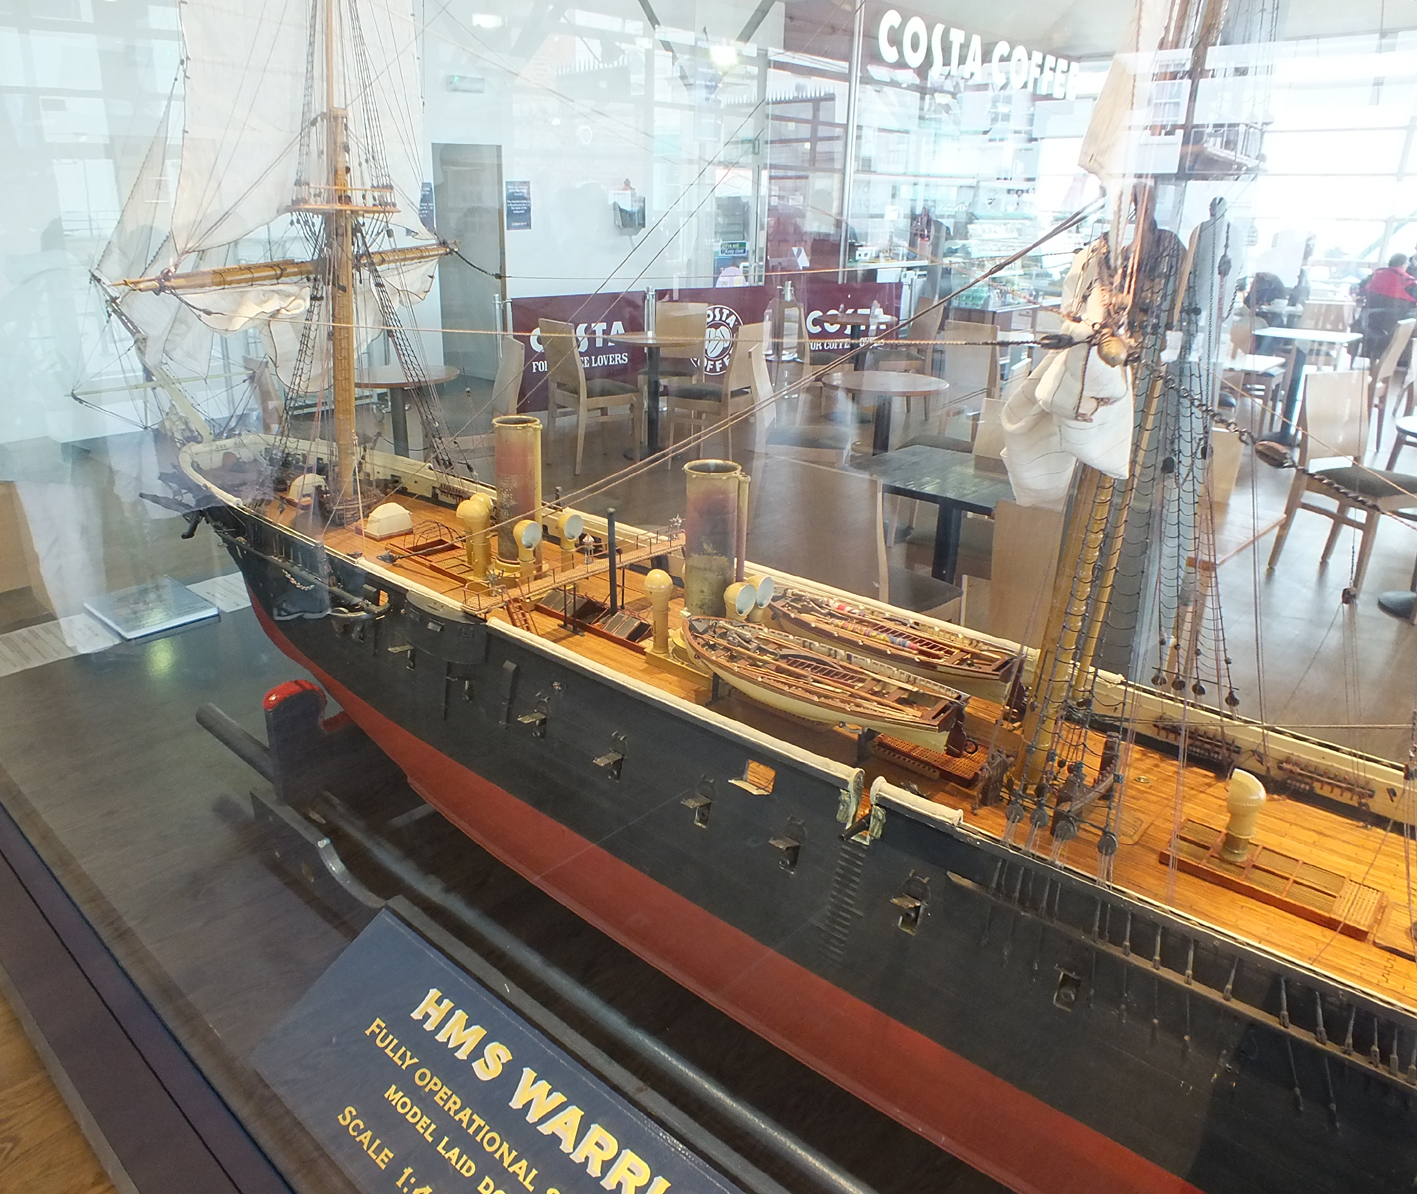
HMS Warrior model by William Mowll
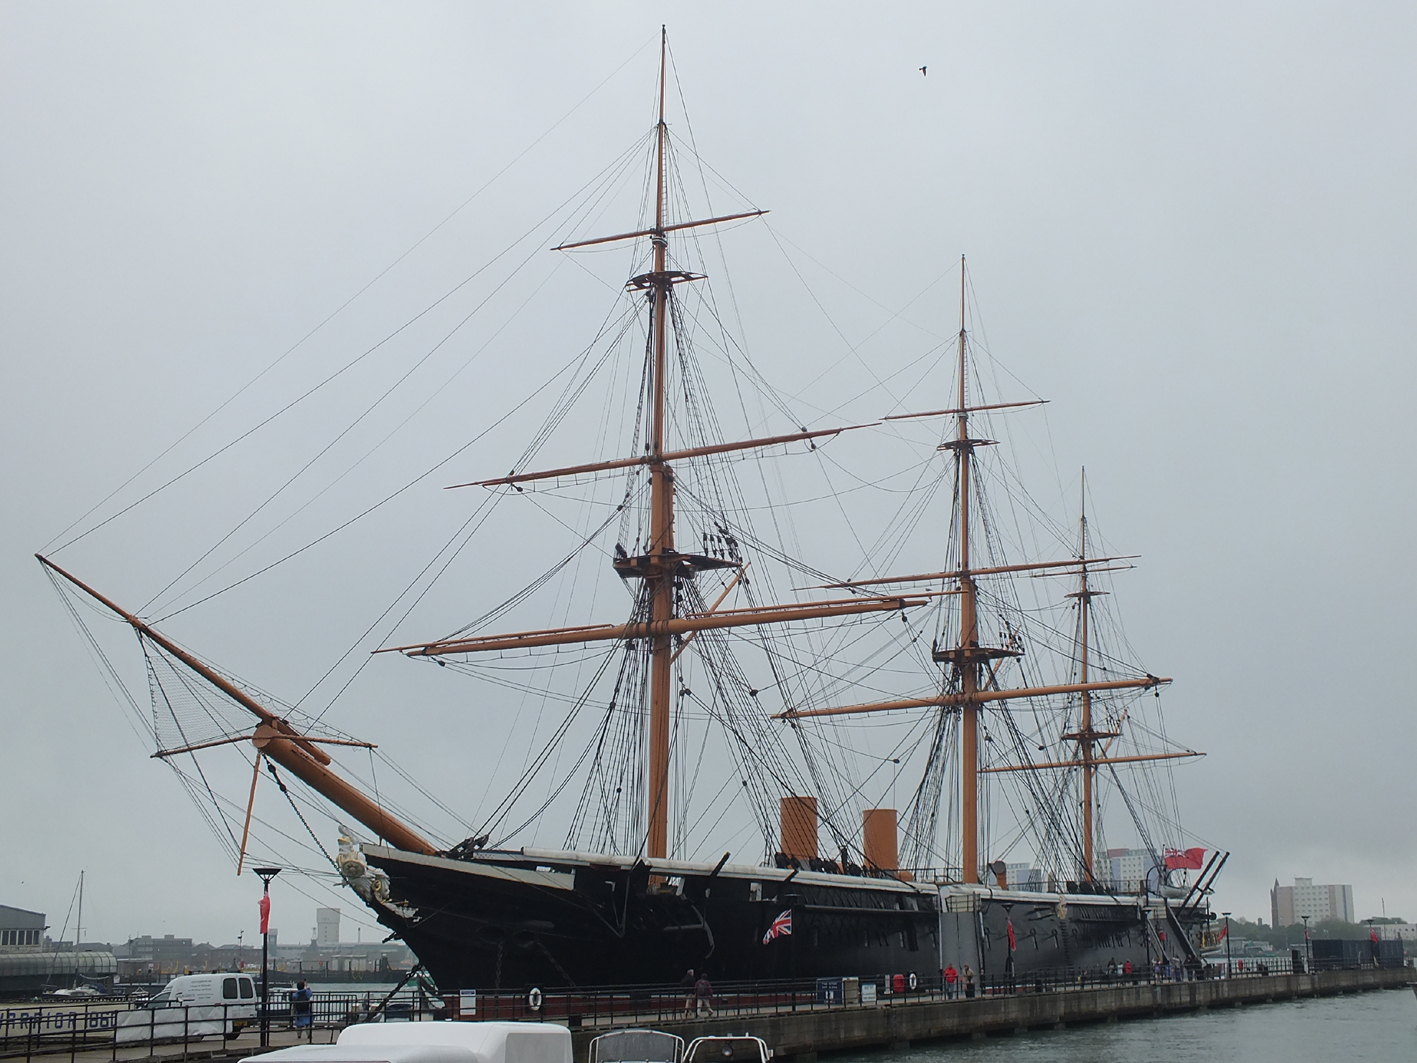
Just returned from a visit to the Portsmouth Historic Dockyard. Principally this was to see the new museum for the Mary Rose and as an ‘extra’ a visit to HMS Warrior.
As expected the Mary Rose was fantastic. It lived up to and exceeded my expectations. Too often I am disappointed by what I call ‘Mickey Mouse’ museums which have been dumbed down in the name of progress (sorry, but I include the recently refurbished SeaCity museum in Southampton under this category). The Mary Rose Trust have excelled themselves and I thoroughly recommend it.
A Wonderful Job
The restored HMS Warrior was another breath taker. The detail that has gone into recreating the ship is astounding. The quality of the work is such that you could believe it had never spent its time as a derelict mooring barge. One of my lasting impressions was just how big and solid it felt when on the main deck. What a shame as a nation we have not preserved one of our World War Two Battleships, that would be truly awesome.
Undressed?
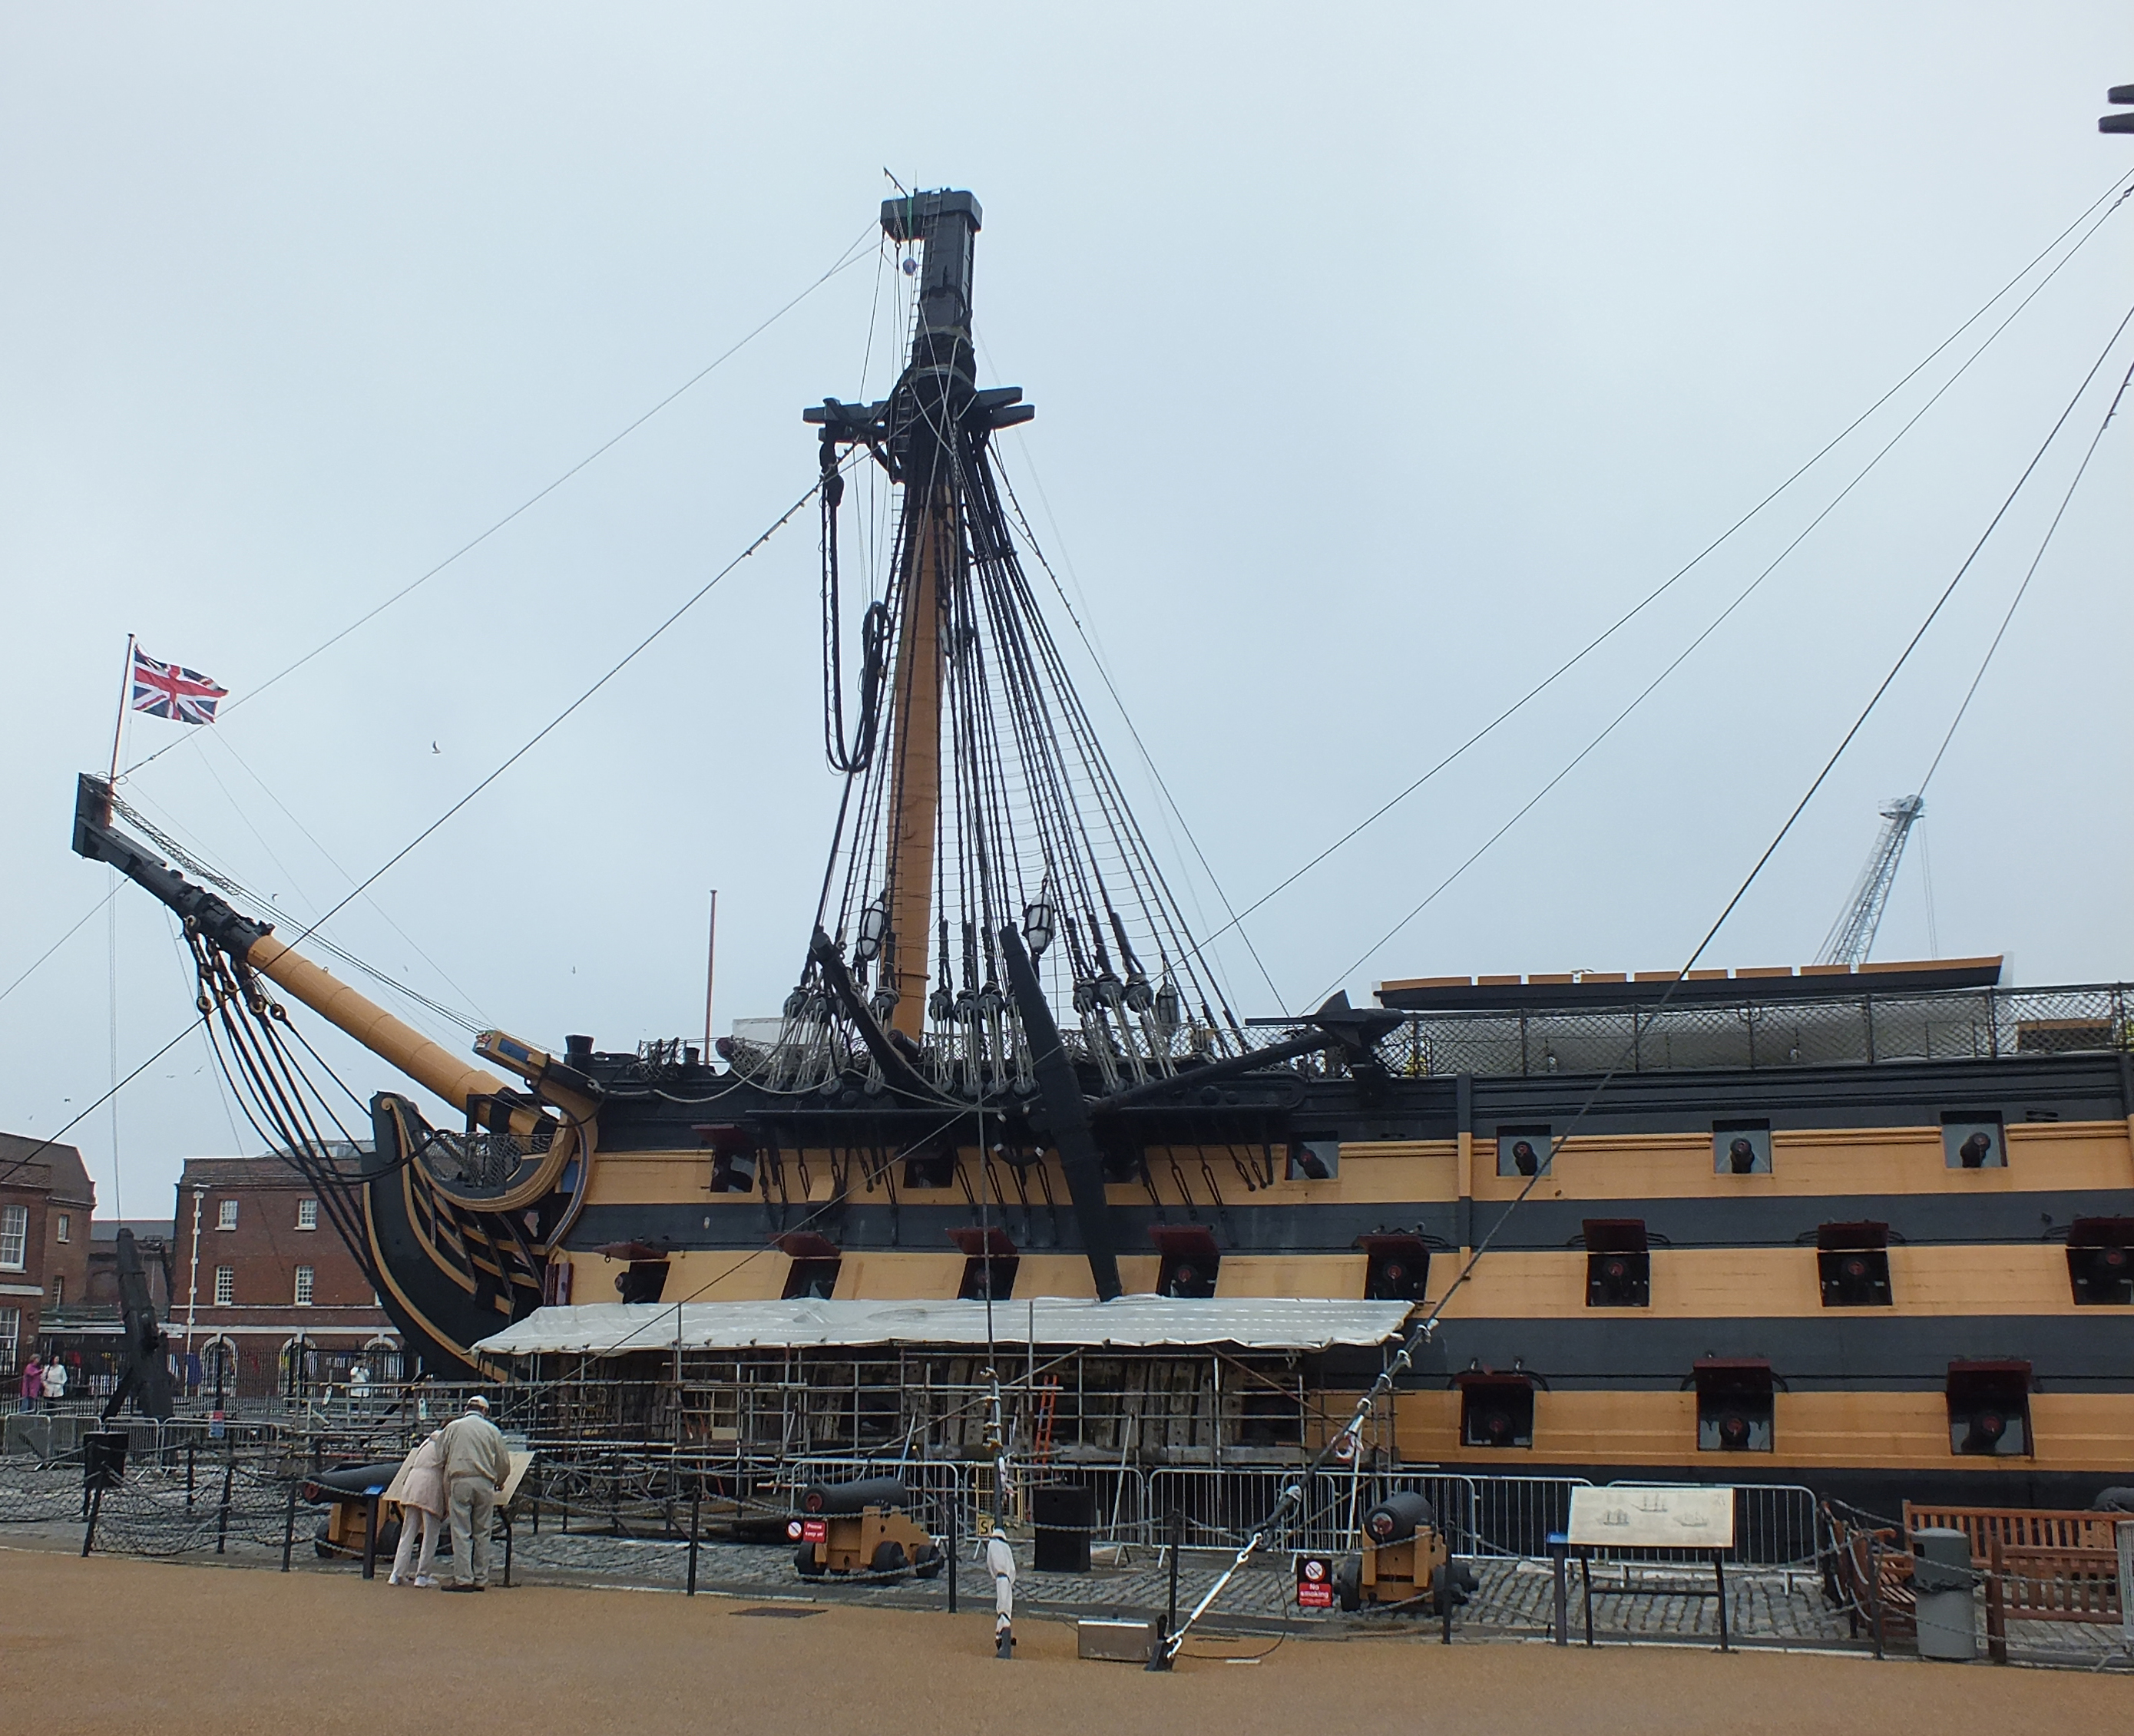
HMS Victory on the other hand was looking very much the very poor relation as she is in the middle of her major refit. Ships are referred to in the feminine tense and when one gazed upon her I couldn’t help thinking that it felt like I had caught her in the middle of getting dressed. Weird.
Beautiful Job!
However, the unexpected jewel (for me anyway) had to be the 1:48 scale model of HMS Warrior in her glass case in the Dockyards main entrance lobby. This was totally unexpected and was quite unlike all the other large scale builders models I have seen over the years. No matter how grand the builders models are somehow they come across as just that, models. Perhaps it’s the too perfect paintwork or the gleaming brass work that makes them look unrealistic.

Midships

Stern Detail
The model by William Mowll seems to have captured the soul of the real thing. It looked impressive and I am sure that if it was seen on the water under steam and sail it would look as if it meant business. A powerful, purposeful beast if ever there was one.
A credit to the builder. I hope my pictures do it justice!
S. O. D. I. T.
Sundry Observed Disasters In Technology
From time to time we all have those little disasters which seem to defy logic and are euphemistically described as obeying Sod’s Law. Here are just some of them.
- Have you noticed how large scale model engineers go to great lengths to provide a mirror finish to their paint and bright work, yet in the smaller gauges modellers go to great lengths to add dirt and general wear and tear to theirs?
- They say perpetual motion can’t be achieved. No? Well drop an 8 ba nut or smaller on your workshop floor and watch that baby run! Damn near perpetual motion to me.
- Why do etymologists’ go to great lengths with special nets and traps to capture new species when in my experience all they need to do is paint their model in the open and within seconds all manner of winged creatures have committed suicide in the paint? Usually the largest or heaviest bug waits until you think the finish has ’tacked off’ before they plough into it with great aplomb.
Self contained steam plant
Last week I happened upon my first stationary steam engine, a Stuart Turner mill engine, which I used to play with as a young boy. It had sat in a box for at least five years and was in a rather sorry state. So in a fit of conscience I decided to restore it and match it up with a vertical boiler I had built some years ago.
The result is a self contained mini steam plant which I can fire up whenever I suffer with ‘steam withdrawal symptoms’ which is usually in mid winter! The vertical boiler is to a design by GLR of Daventry, Northampton and can be fired on either gas or coal.
The gas burner was designed by myself as a ring rather than using a ceramic type. The result is a nice quiet burner without the harsh roar associated with the ceramic ones. In the summer I swap the burner for a grate and run it on coal.

Completed Unit

The completed unit
Working Pressure 50 psi.

Restored Mill Engine

Restored Mill Engine
The Mill Engine has the number 76 stamped on various parts.
Lining is Trimline self adhesive coach line by Model Technics of Shoebury, Essex.
Reflections in the paint finish…..
In the July issue of ‘Old Glory’ Jerry Thurston wrote a very interesting article (Paint Your Wagon) about the importance of a good paint finish setting off a model. I would whole heartedly agree with the sentiments.
What Jerry did not add was the importance of keeping that good paint job ‘good’. I myself have a 7¼” gauge ‘Wren’ built to a superb standard by Alex Gray in 1991. I have owned the model for 20 years and the engine works hard for a living. The paint finish is as good as the day she was built. Over the years I have had many compliments about the condition of the paintwork as well as a number of people assuring me the model must have been repainted!!
The secret to keeping the paintwork fresh is not to clean it whilst the engine is in steam or wet. Too many times I have watched model engineers wipe their model down with a dirty rag, often spraying the model with WD40 first. You might as well use emery paper! All the bits of grit on the model get in the rag, aided by the WD40 and any oil on the cloth, which then act as an abrasive and scratch the paint, dulling it down.
Only when the engine is cool and completely dry do I start the cleaning process. This involves blowing off the fine ash and grit first. Then spray on wax furniture polish and with a clean duster gently wipe it off, this ensures the grit then ‘floats’ off the paint. Regularly turn the duster about to get a clean spot and this way you will avoid trapping a bit of grit and scratching the paint. Once the grit is off take a second clean duster, apply more wax and polish to a bright shine. Some may think this process laborious or unecessary, but the proof of the efficacy of this method is in the longevity of the finish.
Mind you the corollary of all this are the smaller scale modellers, (‘O’, ‘OO’ etc), who like to ‘weather’ their engines for a more realistic effect. Ah well, you can’t win I suppose.
Why are modellers anonymous?
Just returned from holiday in Norfolk. During this time I visited a number of museums, country houses, churches, cathederals and libraries. There were many models of different subjects, shapes and sizes on view, all lovingly created by someone.
Who those ‘someones’ were will remain a mystery as in the majority of cases there was no information. It seems that as a breed modellers are most reluctant to leave their mark on their work for posterity. The details of the builder become even more obscure the more times the model changes hands.
The number of Auctions I attend which have unloved models up for sale and no one knows who built them. Often all the Auctioneer can say is that it has come from ‘a house clearance’. So one assumes that the proud builder has died and the family are no longer interested in it. You can pretty much bet that the model will not have any details of the builder on it.
Take as another example the case of a model galleon which at one time was exhibited in the Science Museum from 1921 to 1925 and a black and white image of which appears on the internet if you google ‘Elizabethan Galleon Model’. Contacting the Science Museum elicits the information that it was built by a gentleman by the name of Freke Field. Who Freke Field was, why he built the Galleon and what happened to it are, it seems, unknown.
Artists it seems are much prouder of their work and they put their name on it. Surely a modeller is also an artist?
So if I have a plea, please at least put your name on the model and the date you built it.
Cookies policy
We only use Cookies for Google Analytics to ensure that we give you the best experience on our website. If you continue without changing your settings, we’ll assume that you are happy to receive all cookies on the JSB Model Restoration website. However, if you would like to, you can change your cookie settings at any time.
We have no control over third party websites which you may access via links on this website. In that instance you need to read their policy.
Follow this link to AboutCookies.org read about controlling cookies
Ernest Arnold Ashby
Having written a brief piece about Mrs Catchpole’s grandfather’s service at sea prompted me to look through my late father’s papers regarding his Uncle Ernest. Father always had a soft spot for him and the painting he did of the ‘SS Kaikoura rounding Cape Horn’. As a child he used to stay with him and the painting had always fascinated him. When their old cottage in Tangley was being sold father was given the painting plus a collection of his merchant navy papers. I thought these might be of interest to others as like Mrs Catchpole’s grandfather, Uncle Ernest was there at the transition from sail to steam plus they are a snapshot of a hard way of life long gone.
First a look at a photograph of Ernest in later life with his wife Pheobe. The photograph is courtesy of his great, great grand daughter, Caroline Hampton. Ernest Arnold Ashby was born in 1870 and died in 1946. Before he went to sea he was a Horsekeeper.

Time spent stirring up water….
This is the list of ships he sailed on in his own handwriting….
Not in chronological order it would seem when compared with the discharge certificates.

Certificate of Discharge
Voyage on the ‘Rimpha’ to Sevastopol.
Closer examination reveals he is known as Thomas Cullen and gives his birth date as 1872. The name Cullen was his mother’s maiden name. But why he chose to be known as that and stated his age as younger I have no idea. Surely it was usual when lying about one’s age to say one was older?
Forever an intriguing mystery.

Certificate of Discharge
Voyage on the ‘Duchess of Cornwall’ to the Black Sea and on the ‘Lismore Castle’ to Cape Town. Returning on Christmas day 1896 and discharged in London.

Certificate of Discharge
Voyage on the ‘Norham Castle’ to Cape Town and on the ‘Kaikoura’ to an unspecified destination. This voyage is described as Mail Service.
At this point Ernest’s turn around times have been very short, perhaps a sign of our reliance on shipping to service the United Kingdom and Empire.
The documentation trail goes cold until June 1912 when the Board of trade introduced a booklet titled ‘Continuous Certificate of Discharge’.

Continuous Certificate of Discharge – explanation

Continuous Certificate of Discharge – Seamans details
Notice the sworn declaration changing his name and birth date.
The reference to a tatoo of ‘Pheobe’ refers to his wife whom he married in 1898 in Tangley, Hampshire. He resided there until his death in 1946.

Continuous Certificate of Discharge – voyages

Character reports voyages 1 – 12
Entry number 5 is the ‘African Prince’ and now he is sailing during wartime.
The ‘African Prince’ was torpedoed off Ireland in July 1917 and sunk.
How lucky was Ernest?

Certificate of Continuous Discharge – Voyages

Certificate of Continuous Discharge – voyages
In the 1920’s Ernest served on the prestigious ‘RMS Berengaria‘ operated by Cunard. The ship was originally the German ‘Imperator’ but was taken as reparations.
Ernest retired from the sea on the 28th May 1922 with an unblemished record.

Account of wages – Edinburgh Castle
His last voyage was on the ‘Edinburgh Castle‘ to South Africa on the Cape Mail run. He was at sea for 52 days.
His last voyage earned him £6 4/- 1d after deductions probably in those days a better wage than a lot of people.
The document makes interesting reading.
To finish, some personal notes from a sailor in a far away land to his loved ones at home

Christmas card 1914

SS Gaika post card

SS Gaika post card
And below an envelope addressed to him on the ‘SS Gaika‘ from those loved ones at home to say he was not forgotten.

Envelope addressed to the SS Gaika
The Barque ‘Shandon’
When I enquired of Mrs. Catchpole about the story behind her grandfather making the model of the ‘Santa Maria’, she wrote telling me about his maritime background, listing the ships he served on. My curiosity was aroused, the result of which was some Google research. To my surprise Google turned up a number of newspaper articles about the Barque ‘ Shandon’, the first ship that Sidney Newing served on when aged 15. This ship turns out to have quite a history.
The Argus dated September 4th, 1934 reports on the ‘acquisition’ for one peppercorn of the ‘Shandon’ by the Ship Lovers Society of Victoria. The article explains the work involved. The London Borough of Poplar is lending 14 authentic ships flags and Bristol are lending some marine relics.
Follow this link to the article:
http://trove.nla.gov.au/ndp/del/article/10975502
The Age dated September 17th, 1934 has an article and photograph. This is reporting her reconversion from a coal hulk to some semblance of her former glory for an exhibition organised by the Ship Lovers Society of Victoria.
Follow this link to the article:
The Age dated October 11th, 1934 has an article on page 11 about the ‘Shandon’ being the centre piece of an exhibition and being moored at Spencer Street in Melbourne, Australia.
Follow this link to the article:
The Argus dated January 19th, 1935 reports that now the exhibition is over the ‘Shandon’ is to be towed away and reconverted to a coal hulk. The article reports some interesting facts about her. ‘She was built 51 years ago (1884) as a 1,397 tons iron clipper. She traded under the British flag for 30 years before being sold to Norway. Sold on to the Commonwealth Government for War Service (WW1) soon after peace was declared she was sold to her final owners as a coal hulk.
Follow this link to the article:
http://trove.nla.gov.au/ndp/del/article/11008629
The Age dated October 9th, 1935 then reports on the ‘Shandon’ Ship Lovers Society being sued over an unpaid bill.
Follow this link to the article:
There you would think the story ends, but no, there is a final chapter.
The Queenscliffe Maritime Museum of Victoria, Australia has the following on their website and I quote from that:
SHANDON DECKHOUSE – CREW QUARTERS
The Shandon was an iron sailing ship of 1397 tons, with dimensions – length 245.9 feet, beam 37.8 feet and draught of 21.3 feet. Built in 1883 at Port Glasgow she had a chequered career as a trader for nearly 40 years. She was converted to a lighter until the end of WWI then re-rigged as a barque and spent the next four years trading across the Pacific Ocean. In 1922 she was in use as a coal hulk in Adelaide. During WWII she was a coal hulk in Townsville.
Shandon had one moment of glory in 1934 when she was involved in Victoria’s 100th anniversary celebrations. Shandon returned to Melbourne sometime in 1961 and was broken up at Coode Island in that year.
In need of some restoration, the Shandon will eventually open as a public display.
Follow this link to their site:
http://www.maritimequeenscliffe.org.au/historic-items/
Makes me think of the current ‘challenges’ facing the preservation of the ‘City Of Adelaide’.
Some things never change in the world of ship preservation, eh?